Hugo Deployment Automation

Table of Contents
In a previous post I mentioned that I am moving to Hugo from Wordpress. One of the main reasons for this is to be able to store my blog in Github to allow for version control.
Automating Hugo #
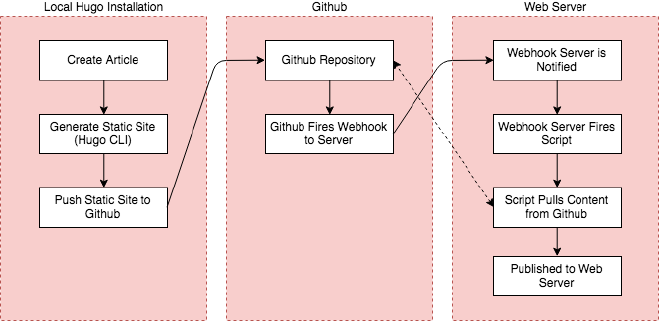
One thing that I missed from Wordpress was the automated way that it works. In Wordpress you write a draft post, add some images and then publish, thats it. For Hugo you create a post, then use Hugo cli to generate the static content, then upload this to a web server and then its published for the world to see. Too many manual steps that makes life difficult.
High Level Automation Workflow #

High Level Automation Steps #
- Create articles/posts in markdown (Local)
- Generate the static HTML (Local)
- Push static HTML to Github (Remote)
- Github fires a webhook to my web server (Remote)
- Webhook invokes a pull of the static content from Github (Server)
- Automated pull of repository
- Static content is served from the server (Server)
Setup Steps #
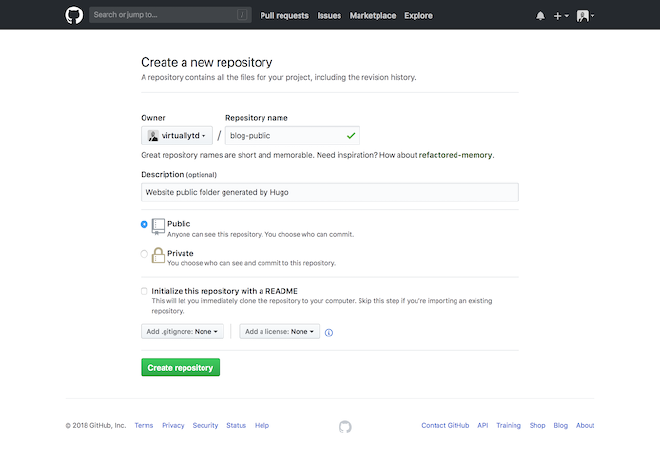
Create a Github Repository #
Create a Github repository for the public folder that is generated by hugo.

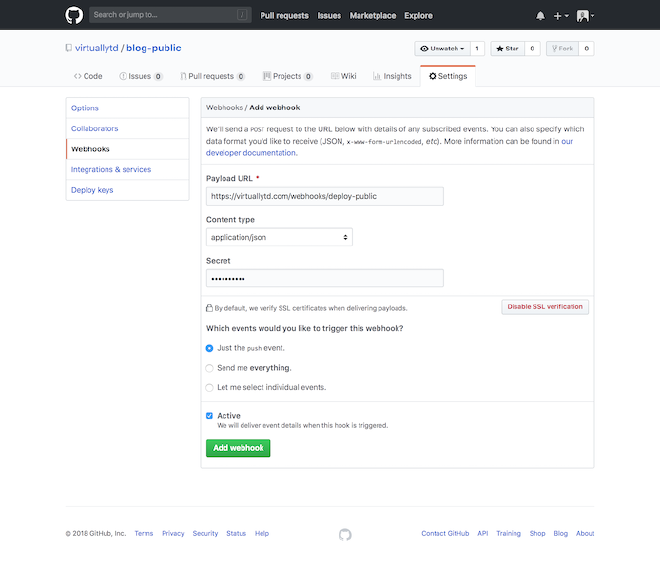
Create a Webhook #
Create the webhook within the repository you just created, this will fire when new code is pushed to this repository.

Setup the Webhook Server #
Use webhook server for a lightweight webhook server and install this on the webserver.
Creat the hooks.json below this has the configuration for the webhook.
| |
Bash Script #
Next create a bash script deploy-public.sh to actually carry out the work of archiving the existing public folder and then replacing it with a cloned version from Github.
| |
Start Webhook Server #
With all the above in place you should be able to start the webhook server and have it listen for connections.
The verbose flag is set for testing the setup. Webhook server will bind to port 9050 on the external IP you set. This can also be proxied as not to expose the service externally.
/somepath/webhook -hooks /somepath/hooks.json -verbose -ip <External IP> -port 9050Testing #
If you test a connection and all is working well you should see some output like this from the webhook command and the public folder should have been updated and an archive created.
[root@server ~]# /usr/local/bin/webhook -hooks /etc/hooks.json -verbose -ip <External IP> -port 9050
[webhook] 2018/06/17 20:44:56 version 2.6.8 starting
[webhook] 2018/06/17 20:44:56 setting up os signal watcher
[webhook] 2018/06/17 20:44:56 attempting to load hooks from /somepath/hooks.json
[webhook] 2018/06/17 20:44:56 found 1 hook(s) in file
[webhook] 2018/06/17 20:44:56 	loaded: deploy-public
[webhook] 2018/06/17 20:44:56 serving hooks on http://<External IP>:9050/hooks/{id}
[webhook] 2018/06/17 20:44:56 os signal watcher ready
[webhook] 2018/06/17 20:45:11 [xxxxxx] incoming HTTP request from <External IP>:42138
[webhook] 2018/06/17 20:45:11 [xxxxxx] deploy-public got matched
[webhook] 2018/06/17 20:45:11 [xxxxxx] deploy-public hook triggered successfully
[webhook] 2018/06/17 20:45:11 200 | 644.658µs | <External IP>:9050 | POST /hooks/deploy-public
[webhook] 2018/06/17 20:45:11 [xxxxxx] executing /somepath/deploy-public.sh (/somepath/deploy-public.sh) with arguments ["/somepath/deploy-public.sh"] and environment [] using /somepath as cwd
[webhook] 2018/06/17 20:45:13 [xxxxxx] command output: Cloning into './public'...
[webhook] 2018/06/17 20:45:13 [xxxxxx] finished handling deploy-public
If you have any issues with this make sure to check the logging from the webhook server and also check in Github under the webhook page for any responses/errors.
Automate Pull from Github #
To create an automated pull of data from the github repository we need to configure a deployment key. This key will allow a git pull (Read Only).
Create the SSH key #
Generate an SSH Key on the server
[root@server ~]# ssh-keygen -t rsa -C "deploykey@example.com"Save the key somewhere on the system.
Configure SSH Credentials #
Edit the file
[root@server ~]# vi /root/.ssh/configAdd the following lines
Host gitserv
    Hostname github.com
    User git
    IdentityFile /root/.ssh/id_rsa
    IdentitiesOnly yes
Add Public Deploy Key to Github #
Open your repository and go into settings > Deploy Keys.
In here add the public key of the keypair we generated in the step before and click save.
Now when the script we created earlier invokes a git pull, it will use this configuration and use the deploy ssh key to connect to github.
Managing the Webhook Service #
To efficiently manage the webhook server, a systemd service can be created. This allows the server to start and stop the webhook service automatically.
Creating a systemd Service #
Create a file named webhook.service in the /etc/systemd/system/ directory with the following content:
[Unit]
Description=Webhook Service
After=network.target

[Service]
Type=simple
ExecStart=/usr/local/bin/webhook -hooks /etc/hooks.json -verbose -ip <External IP> -port 9050
ExecStop=/usr/local/bin/stop_webhook_script.sh
Restart=on-failure

[Install]
WantedBy=multi-user.target
Creating the Stop Script #
Create a script stop_webhook_script.sh to stop the webhook service:
#!/bin/bash
# Find and stop the webhook process
PID=$(ps -ef | grep '/usr/local/bin/webhook' | grep -v grep | awk '{print $2}')
if [ ! -z "$PID" ]; then
    kill $PID
    echo "Webhook service stopped."
else
    echo "Webhook service is not running."
fi
Place this script in /usr/local/bin and make it executable with chmod +x /usr/local/bin/stop_webhook_script.sh.
Managing the Service #
Enable the service to start on boot with sudo systemctl enable webhook.service. Start it with sudo systemctl start webhook.service and stop it with sudo systemctl stop webhook.service.